

The first (and biggest) Star Destroyer project
The first time I tried this project was 1981. It involved a lot of cardboard, masking tape and several precariously wired 60 watt light bulbs. Probably a good thing it didn't make it too far.
Just a few short years later, I was ready to try it again. Although I've recently played around modifying models, this is my first serious attempt at a scratch build.
Project started in the Summer of 2004

The basic frame was initially scaled and tested using poster board. Once I was happy with the shape, the poster board was used as templates to cut out the wood. This would have been around early November, 2004

More support added to the ribs and a piece of styrene cut and laid out. (I bought two 4x8 sheets of styrene for the project)
The underside roughed in

Once the bottom was glued to the frame, the Main Hanger was the first section I started to detail

I started adding the lights, the Main Hanger has eight LED's providing indirect light. The rest are fiber optics.

A closer look

I then roughed in the engine area and did a lighting test. The smaller thrusters are LED's and will always be lit. The primary thrusters are made out of flashlight parts, using the reflector base to provide a wide and bright spill. These can be turned on and off while leaving the rest of the ship lit.

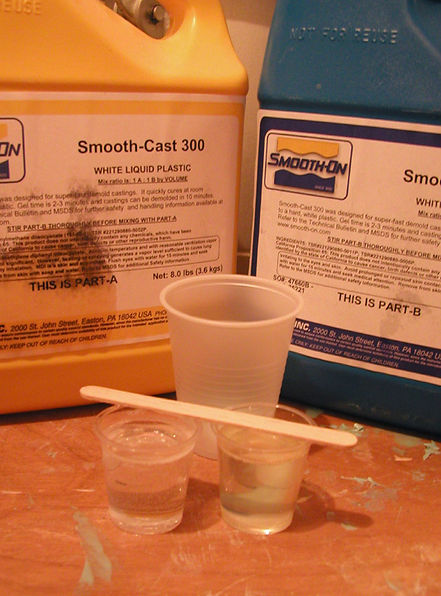
Inside wiring and fiber runs. The side panels are made up of battleship parts, I built a 12" master, struck a mold then cast resin duplicates. After gluing the resin pieces in place, I was able to super detail and disguise the replicating pattern.

A closer look at the side panel.

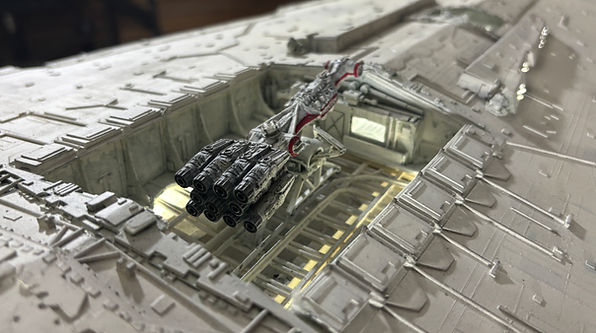
Another detail shot, the launch bay was later detailed and tiny TIE fighters added (8 hanging from above, two on deck and ready to go)

The underside with side panels attached.

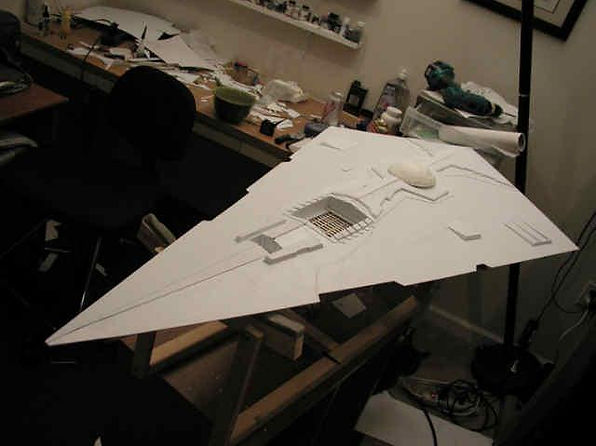
Starting on the top

Starting to rough in the super structure. (March 14, 2005)

The Super Structure finally in place ... just a tiny bit of detailing left to do ...!

... and about a thousand more fiber stands.

I've had a few requests to see the tiny TIE fighters.

After a few busy weeks I've been able to get back to work. Starting to detail the Super Structure has only proven how daunting this stage is going to be. It's also become clear that I'm going to need to make adjustments to the scale of the upper two levels.

I've spent the last week building the cannons. I created a master, molded it then made eight duplicates. To prevent breakage, the cannon barrels are metal. I snipped off the ends of needles and placed them in the mold before pouring the resin. The studio model has four barrels on each cannon, I reduced it to three due to the smaller scale. (It should be noted that the actual cannons are not glued down yet, they should sit straighter once I'm ready to affix them.)
September 2007
Finally back to work! I spent about a week looking her over, trying to figure out where I left off and how to get back into it. This project started off as my first scratch build, but now that I have three 24" versions under my belt, it will finish as my fourth. I've found quite a few things that I did that I would do drastically different now. I've gone back and corrected whatever I could, but will need to live with a few things. Mostly issues with symmetry. Live and learn.
I chose to start with the engine area. I rebuilt the secondary engines and the housings, have rebuilt the outer ring of the primary engines to get a more true circle.
Once the rest of the engine area structures were complete I start adding the detail layers. So far, the center engine is as far as I've gotten


(Had to use those MPC Falcon Landing Pads somewhere!)


I finally completed the rear engine area and am ready to start back into the super structure.


The main engines aren't aligned yet, I've decided to replace the tungsten bulbs with LEDs.
September 30, 2007
After doing the three 24" versions and coming back to this project, I decided that the proportions of my super structure were off. I spent much of the week correcting and rebuilding each level.

The Bridge still looks a little too big, but once the "shelving" is added to the super structure, it will widen it out and hopefully bring the bridge down to scale.


Starting to pencil in the panel lines to be scribed. i slow and tedious process that will probably make up most of the progress this coming week. It's a boring chore, but it really pays off.

Finally finished the hull etching. Tedious, but it's done!


November 18, 2007
Progress has been slow, I've had a few "real life" distractions in past few weeks. The LED's haven't been color corrected yet, so are still burning too bright and too blue.


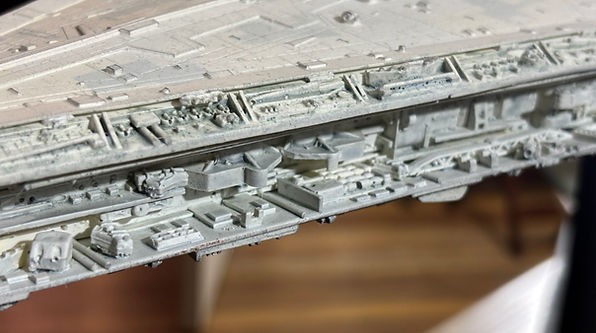
Detailing


Little squares and shapes glued all over the surface, more them probably ended up lost in the carpet, but the upper hull should be just about complete, now on to the super structure.


The actual guns aren't in place, they won't go in until I'm ready to paint.

Here's a peek at some of the greebles being molded, enabling me to reproduce them in resin

Pressure is essential!


Here's another jump in time. #D printing has entered the arena. Most parts are still being hand-crafted or poured in resin, but Fusion360 and resin printers quickly go from "cheating" to just another tool in the aresenal of a scratch builder

I've decided to ditch the second set of enginebell in favor of 3D printed ones. Additionally I swapped out the tunsten engine lights for LEDs

Sill a ton of surface work to do


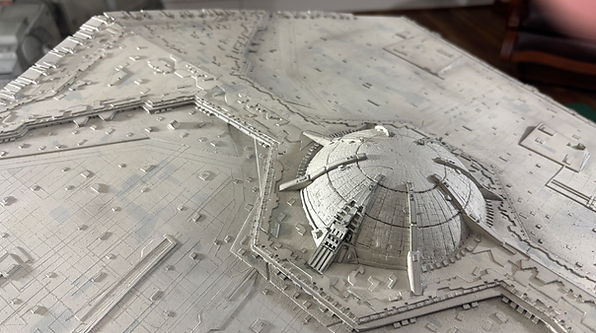
Most everything below the bridge is good old-fashioned scratch building, but I decided to lean heavily on 3D design and printing on the bridge to showcase the progression of the hobby!


Looks about time to call it done!

My 3D details superimposed over the ILM 8' model


These are some of the templates I cut to airbrush surface patterns into the paint

Surface paint


Fiber optic "whiskers will hang around until painting is complete

The new engine bells and LED lighting
After 20+ years of on and off work, here she is:


She took the "Best of Star Wars" award at Wonderfest!